

In addition to the standard metadata fields, PDFs metadata can also include custom fields. This tool is used to configure the type of fields.
The use of custom fields further increases the program cataloging possibilities, adding more metadata fields where we can enter more specific metadata, and within more categories.
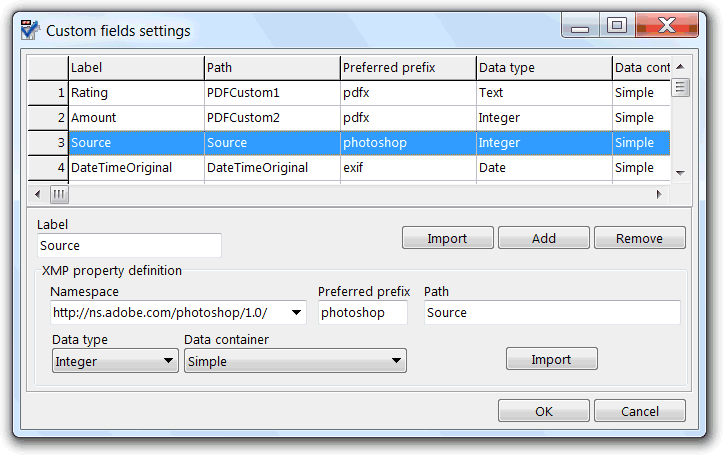
With this tool we can define PDF standard info dictionary custom fields, and also metadata property fields that are stored in the XMP (Adobe's Extensible Metadata Platform) object. Other than the standard metadata fields, and simple PDF custom fields, of the PDF file format itself, PDFs can store much more metadata properties using this Adobe extension, that is also used to store metadata in many other popular file formats. Some of the advantages of this technology is that metadata can be retrieved, and edited, by tools that don't need to know about the file format itself, and that metadata fields can use a much more structured definition, either standardized or proprietary.
To define a simple custom field, we just need to click the Add button and give it a meaningful name in the Label field. That will be the name that will show up later in the rest of the program interface. Even so, we can later mask these names with the help of the custom grid layouts.
If the custom field is to be linked to another application defined PDF custom field, we also need to set the Path field to the exact name used by that other application. These names are case sensitive, and must be unique.
As example, an e-mail to PDF archiver tool would use names such as: MailFrom, MailSubject, MailDate, etc.
If we are just adding a PDF Explorer specific custom field, we can leave this path field with the default PDFECustom# form, as this is not important in terms of program usability. Even so, meaningful names are always better to reference what is in these fields, for when using other applications to check that metadata.
To define a XMP field we need to specify its namespace, its preferred namespace prefix, its path in the XMP hierarchy, its data type and its data container type. The meaning of this settings are extensively explained in the XMP documentation.
When defining a custom field, usually, what we need is to link it to an already defined one, and in use in a PDF file. We can type its settings manually, after using the add button to add a new field to the list of custom fields, but doing this with the Import button is much more handy. This button enables the retrieving of the field settings from a PDF file that already store the field in its XMP object. This button prompts the user to select a PDF or XMP file, showing then the fields import dialog, where all the fields found in the selected file are shown.

To import a field there is only the need to check its checkbox. Multiple fields can be selected at once, if using the import button just below the list of custom fields, resulting in equal number of custom fields being added to the list.
The other Import button, in the field settings definition panel, will retrieve only the settings to that custom field itself.
The maximum number os custom fields that can be defined is set to 100.
After the custom fields are set, PDF Explorer will start to gather the metadata of these fields, when indexing new files. Because of that, and if the files are already indexed in the database, there is the need to force the re-indexation of these files, in order to apply the new custom fields settings. This requires the folder where these files reside to be removed from the database, using the database edit tool, and re-indexing the folder again using, as usual, the direct scan mode DiskTree. This step is only needed if files already contain metadata in these fields, so to add it to the database. If we are setting new, and specific, custom fields configuration we only need to start to add metadata to these new fields in order to use them.