This tool is used to stamp text, raw images, and geometric shapes, on PDF pages. It is ideal to stamp company logo or information stamps like "Draft", "Confidential", "Copy" in our PDFs. The tool GUI provide visual creation of the final stamp object than can aggregate many basic objects as: text, raw images, geometric shapes, or even other PDFs pages content.
Stamp composition
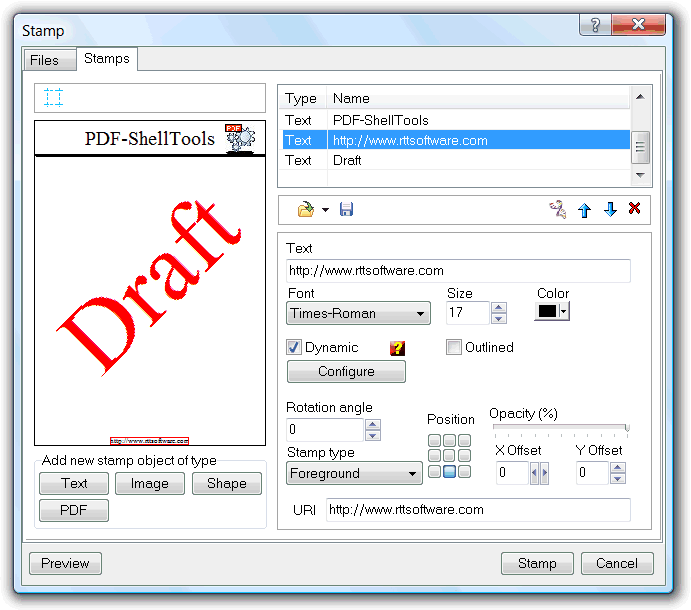
The GUI Stamps tab sheet is used to compose the stamp template by combining different stamp objects. The final stamp, the one it will be stamped onto the PDFs pages, can be as simple as a text only object, or a composition involving more of the same type, or different, stamp objects. There is the possibility to save the stamp template so it can be use later for other stamp operations. A requirement when stamping from the command line interface, as this interface can only stamp by using a saved template.
The available stamp objects are of type:
- Text - To add static, or dynamic, text content. Dynamic text objects, discussed bellow, provide a mean to stamp text content that need to change with stamped page number, stamp operation date and time, stamped document filename, and many other variables.
- Raw Image - To add raw images. Supported image formats include: Windows bitmaps (*.bmp), CompuServe Graphics Interchange (*.gif), JPEG (*.jpg), Portable Network Graphics (*.png) and Tagged Image File Format (*.tif;*.tiff). Multipage images, bit and alpha transparency, are properties supported for formats with these functionalities.
- Geometric Shapes - To add rectangles, round rectangles, circles and ellipses shapes.
- PDF page - To add all the PDF page contents, from a user selected PDF file and page, as source of the stamp object. Useful when the complexity of the needed stamp can not be achieved with the stamps objects composition provided by the tool. This way we can use an external program to create the stamp object, export it to PDF, and later use it in the composition of the stamp as one more stamp object.
The stamp composition is done adding, and positioning, stamp objects with the help of a basic WYSIWYG (What You See Is What You Get) interface, representing an A4 media page size. Different stamp type objects have different properties panels to define the way the object will look like in the final stamp. Size, scale and colors are some examples of these properties. In the above screenshot image, the text stamp object properties panel is visible.
All the stamp objects have some properties that are common, but not shared, to all. They are:
- Rotation angle - to specify the object draw angle.
- Position - to define the object draw position in relation to the stamped page. i.e. left top, top center, center, bottom right, etc..
- X and Y offsets - to displace object position, from the specified root position, horizontally and vertically respectively.
- Opacity - to define the opacity percentage of the object (100% equal to total opacity, 0% to complete transparency).
- Stamp type - Foreground to be stamped on front of the page contents, and background to be stamped behind the page contents. The first method grants that the stamp object will be always visible, independently of the page contents. As for the second method, it can only show up in places where there are no page contents, like underneath text.
- URI - To enter a Uniform Resource Identifier (http web address, e-mail address,etc.) linked to that stamp object bounding box rectangle. PDF readers will provide access to these URI's when user clicks on the object.
Some properties, as scale and size, behave differently from common sense, when setting these values to zero. This specific value instruct the tool to consider that value as the page width/height, or scale the object to these page extents.
Object layering rules are used when more than one stamp object is in use. Front objects hide back objects. The layer order can be changed, changing the object position in the list of stamp objects.
Set margins
The margins tool, invoked by the ![]() tool button, is used to add margins to the stamped page. Provides a way to add blank space where the stamp can be positioned, when there is a need to that space. The margins will affect only the page contents, do not interfere with the stamp object position.
tool button, is used to add margins to the stamped page. Provides a way to add blank space where the stamp can be positioned, when there is a need to that space. The margins will affect only the page contents, do not interfere with the stamp object position.
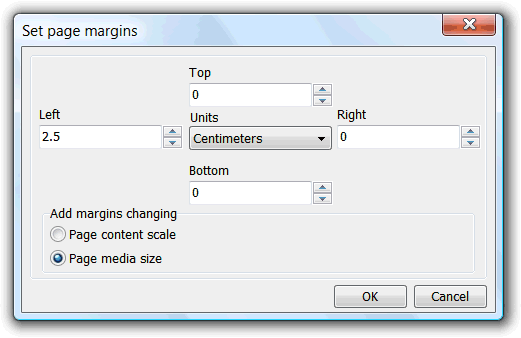
There are two possibilities to add margins to the document page. By scaling the page contents, or changing the page media size.
The first option will add the specified margin by scaling the, already in the page to be stamped, content. This option maintain the page media size but will distort the contents if specified margins are different from each other.
The second option is more secure as extra space is added by resizing the page media size itself.
Visual aids are displayed in the WYSIWYG interface to help in the position of the stamp objects.
Dynamic text objects
When a text object is configured to be treated as a dynamic text object, by checking the dynamic check box of the text object properties panel, will instruct the tool to interpret the next mentioned bracket enclosed constants as references to dynamic text objects output.
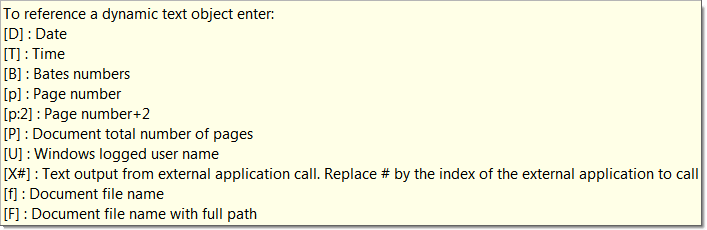
These constants will be replaced by the referenced dynamic text object output at time of the stamping operation.
Only these bracket enclosed references are interpreted as dynamic. Stamp text object composition can include static text too. e.g. Stamped [D] at [T] by [U]
The [X#] constant reference a powerful dynamic object. This object is able to gather external applications console text output as source of this object text output. Configured in the Dynamic Text Settings, see bellow, the # has to be replaced by the configured external application index ( [X1], [X2], etc.).
This object can call the configured external application passing, as parameters, the filename, and, actual to stamp, page number, of the document being stamped. This info can be used by the external application to query databases, or any other fancy operation, in order to generate the text to stamp.
The dynamic text object properties panel "configure" button provides access to the Dynamic Text Stamp Settings Dialog.
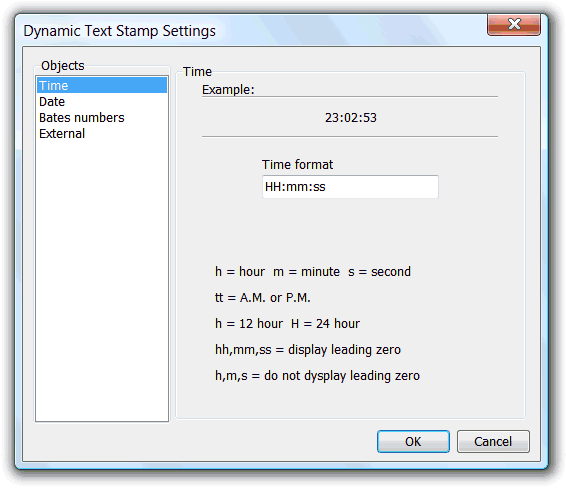
This dialog is used to configure the diverse dynamic text objects settings. Can be used to define the Time and Date format, Bates numbers properties, and External applications linkage.
This settings are saved with the stamp template. Other saved stamp templates can have different settings.
Page stamp options
The Files tab sheet is used to check the files that are going to be submitted to the stamp operation, define the documents pages to stamp, and to specify the stamp mode and stamped file save mode options.

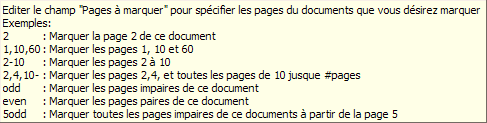
By default, all the documents pages are selected to be stamped, but the Pages to stamp column fields can be edited to custom define what pages to stamp, using the following rules:
The preview button uses the list selected file as file to stamp preview, so, to check how the current stamp template will look like when stamped onto a specific file, just make sure that file is selected before clicking the preview button.
The stamp template is defined for an A4 page size, the one represented in the WYSIWYG output. The stamp mode options define how to behave when stamping pages with different sizes. The fit to page option will scale the stamp, up or down, in order to maintain proportionality to the designed stamp template. If the Maintain aspect ratio option is also checked, only the X scale proportionality is maintained, sacrificing the Y scale but maintaining the aspect ratio of the designed stamp template. Design scale will be used if Fit to page option is unchecked.
The file save mode selector define if the stamped file override the source file, if a backup unstamped file is created, or if user must be asked for an output folder where to put the stamped files.
Interface de la ligne de commande :
| Nom de la fonction: | Stamp |
| Options: | [] Paramètres optionnels |
| [StampRules=] | - Expression spécifiant les pages du document à marquer. Voir image ci-dessus pour la syntaxe |
| [Template=] | - Arborescence complète du fichier modèle. Un fichier modèle est un tampon créé préalablement puis sauvegardé |
| [OutputPath=] | - Arborescence complète où est créer un fichier texte. si non spécifié, l'arborescence du fichier source est utilisé |
| [-CreateBackup] | - Si spécifié, créer un fichier de sauvegarde |
| [-s] | - mode muet. S'exécute sans faire apparaître l'interface (valable uniquement pour les utilisateurs sous licence) |
| FilesList | - Liste de fichiers PDF à marquer; Séparer les fichiers en utilisant la touche ";". Cette fonction doit être le dernier paramètre indiqué |
| Exemple: Rundll32 "c:\Program Files\PDF-ShellTools\PDFShellTools.dll",Stamp OutputPath=c:\Stamped stamprules=1 Template=c:\stamptemplates\MyLogo.stp C:\tmp\*.pdf |
|