This tool is used to stamp text, raw images, and geometric shapes onto PDF pages. It is ideal to stamp a company logo or informational stamps like "Draft", "Confidential" or "Copy" on top of PDFs. The tool GUI provides visual creation of the final stamp object and can aggregate several basic objects such as: text, raw images, geometric shapes, or even content from other PDFs.
Stamp composition
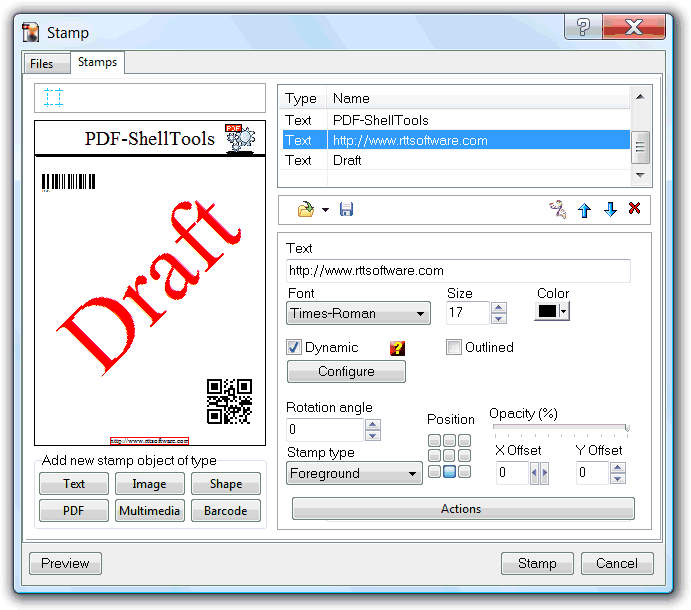
The GUI Stamps tab sheet is used to compose the stamp template by combining different stamp objects. The final stamp, the one that will be stamped onto the PDFs pages, can be as simple as a text only object, or a composition involving more of the same type, or different, stamp objects. It is possible to save the stamp template for future use for other stamp operations. When stamping from the command line interface, only saved templates can be used for stamping.
The available stamp objects are of type:
- Text - To add static, or dynamic, text content. Dynamic text objects, discussed below, provide a mean to stamp text content that need to change with stamped page number, stamp operation date and time, stamped document filename, and many other variables.
- Image - To add images. Supported image formats include: Windows bitmaps (*.bmp), CompuServe Graphics Interchange (*.gif), JPEG (*.jpg), Portable Network Graphics (*.png) and Tagged Image File Format (*.tif;*.tiff). Multipage images, bit and alpha transparency, are properties supported for formats with these functionalities.
- Geometric Shapes - To add rectangles, round rectangles, circles and ellipse shapes.
- PDF page - To add all the PDF page contents, from a user selected PDF file and page, as source of the stamp object. Useful when the complexity of the needed stamp cannot be achieved with the stamps objects composition provided by the tool. This way we can use an external program to create the stamp object, export it to PDF, and later use it in the composition of the stamp as one more stamp object.
- Multimedia - To add Flash SWF animations, MP3 audio, Flash FLV's and H.264 video. Useful to add animated logos, background music and video content. The multimedia can be embedded or remotely accessed (e.g. YouTube videos). Supports the creation of play lists for audio and video content. The main configuration of this object is done from the insert multimedia dialog.
- Barcode - To add 1D, 2D and composite barcode representation of static or dynamic values. Some specificities of this stamp object are discussed bellow.
The stamp composition is done adding, and positioning, stamp objects with the help of a basic WYSIWYG (What You See Is What You Get) interface, representing an A4 media page size. Different stamp type objects have different properties panels to define the way the object in the final stamp. Size, scale and colors are a few examples of these properties. In the above screenshot image, the text stamp object properties panel is visible.
All the stamp objects have some properties that are common, but not shared, to all. They are:
- Rotation angle - to specify the object draw angle.
- Position - to define the object draw position in relation to the stamped page. i.e. left top, top center, center, bottom right, etc.
- X and Y offsets - to displace object position, from the specified root position, horizontally and vertically respectively.
- Opacity - to define the opacity percentage of the object (100% equal to total opacity, 0% to complete transparency).
- Stamp type - Foreground to be stamped on front of the page contents, and background to be stamped behind the page contents. The first method grants that the stamp object will be always visible, independently of the page contents. As for the second method, it can only show up in places where there are no page contents, like underneath text.
- Actions - To define actions to execute in response to events (onClick, onEnter,etc.) on the selected stamp object. This button opens the Actions editor.
Some properties, such as scale and size, behave differently from expected behaviour, when setting these values to zero. This specific value instructs the tool to consider that value as the page width/height, or scale the object to these page extents.
Object layering rules are used when more than one stamp object is in use. Front objects hide back objects. The layer order can be changed, changing the object position in the list of stamp objects.
Set margins
The margins tool, invoked by the ![]() tool button, is used to add margins to the stamped page. Provides a way to add blank space where the stamp can be positioned, when there is a need to add that extra space. The margins will affect only the page contents and do not interfere with the stamp object position.
tool button, is used to add margins to the stamped page. Provides a way to add blank space where the stamp can be positioned, when there is a need to add that extra space. The margins will affect only the page contents and do not interfere with the stamp object position.
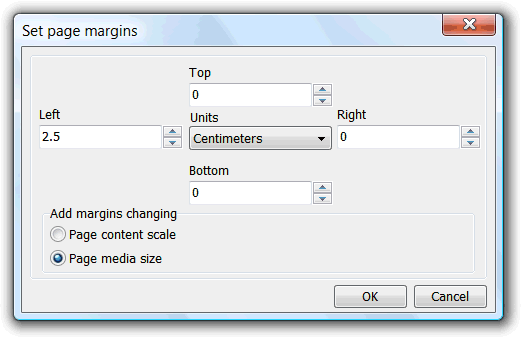
There are two possibilities to add margins to the document page: by scaling the page contents, or by changing the page media size.
The first option will add the specified margin by scaling the, already in the page to be stamped, content. This option maintains the page media size but will distort the contents if specified margins are different from each other.
The second option is more secure as extra space is added by resizing the page media size itself.
Visual aids are displayed in the WYSIWYG interface to help in the position of the stamp objects.
Barcodes
This stamp object is similar to the text object but instead of stamping text its value will be represented as a 1D, 2D or composite type barcode, using vectorial entities for better quality printout. It supports a multitude of standards, such as Code 128, Data Matrix and QR Code, selected from the barcode type field.
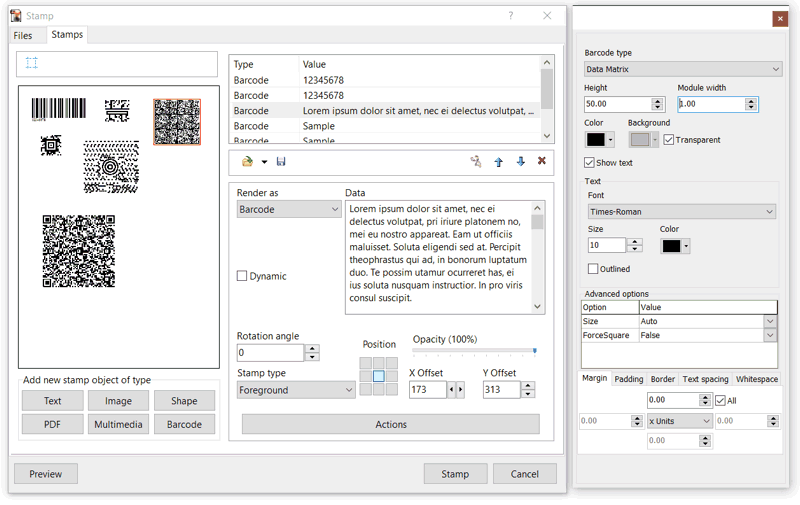
Because of the number of configurable options, its settings panel can be detached, as depicted in the above screenshot, to better interact with the settings fields. Some of the settings are specific to the selected type of barcode, and so only visible/enabled for that type.
As with the text object, its value can be defined dynamically, by checking the dynamic named checkbox. In this state the value will be dynamic calculated, as explained bellow.
The input format to specify the value for composite type barcodes (1D+2D) - because the settings pane provides only one input field for the value - should assume this form: [pri]primaryvalue[/pri]secondaryvalue.
The input format for barcodes that require an AI (application identifier) should enclose the AI in [square brackets] followed by the data to be encoded, e.g. [21]123456.
Dynamic text and barcode objects
When a text or barcode object is configured as a dynamic object, by checking the dynamic check box of the object properties panel, the tool will interpret the next mentioned bracket enclosed tags as references to dynamic values.
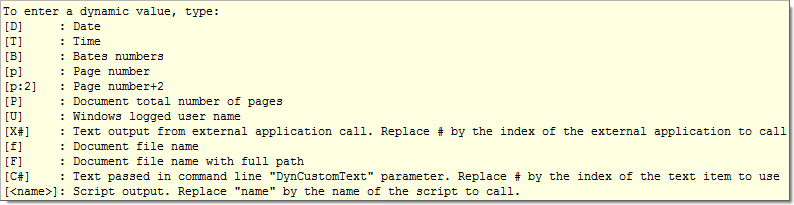
These tags will be replaced by the referenced dynamic value at time of the stamping operation.
Only these bracket enclosed references are interpreted as dynamic. Value composition can include static data as well. e.g. Stamped [D] at [T] by [U]
- The [X#] tag reference is a powerful dynamic object. This object is able to gather external applications console text output as a source for the object value. Configured in the Dynamic Text Settings, see below, the # has to be replaced by the configured external application index ( [X1], [X2], etc.).
This object can call the configured external application passing, as parameters, the filename and number of the page of the document being stamped. This info can be used by the external application to query databases, or any other fancy operation, in order to generate the data to stamp.
- The [C#] tag is only meaningful when the tool is called from the command line interface. This tag will be replaced by the respective text item passed in the "DynCustomText" parameter. Check below for better details.
- The [<name>] tag is used to reference custom created scripts, using the Active Scripting technology. The "name" part needs to be replaced by the script name to call, i.e. a [<FirstWordInPage>] tag will be replaced, when calculating the dynamic expression, by the output of a script named FirstWordInPage. Scripts are created from the dynamic text settings dialog, explained bellow.
The script functions have access to two global objects, named CurrentTask and BatchFile. The CurrentTask object has a unique property, named PageNumber, that returns the number of the page being stamped, so the script can dynamically adapt by page number. The BatchFile named object has the same structure of the IFileObject object of the MyScripts API, and represents the PDF file being stamped, so the script can dynamically adapt when batch stamping a list of PDFs. Here's is a dumb JScript sample script depicting the utilization of both objects:
function FirstWordInPage() {
    var words = BatchFile.Pages(CurrentTask.PageNumber - 1).text.split(' ');
    for (var i = 0; i < words.length; i++) {
        if (words[i] > '') {
            return words[i]
        }
    }
}
Utilizing the [<name>](param) tag format, the expression can pass to the script a text parameter. Here's is an example using the above explained [C#] tag to control the script output from the command line:
function ProcessCmdLineParam(param) {
    switch (Param) {
    case 'Title':
        return BatchFile.Metadata.Title;
        break;
    case 'Subject':
        return BatchFile.Metadata.Subject;
        break;
    case 'Author':
        return BatchFile.Metadata.Author;
        break;
    default:
        return '';
    }
}
Having the expression [<ProcessCmdLineParam>]([C1]) as the dynamic expression, the same stamp template can be used to stamp different metadata values from a command line call, such as:
PDFShellTools.exe Stamp Template=c:\PDFStamps\DynCLI.stp DynCustomText=Title C:\PDFs\*.pdf
or
PDFShellTools.exe Stamp Template=c:\PDFStamps\DynCLI.stp DynCustomText=Author C:\PDFs\*.pdf
Dynamic stamp settings dialog
The dynamic objects properties panel configure button provides access to the Dynamic Text Stamp Settings Dialog.
This dialog is used to configure the diverse dynamic objects settings. Can be used to define the Time and Date format, Bates numbers properties, the available external applications and to create/edit the scripts that can be used as source of dynamic values.
These settings are saved with the stamp template itself, so may be different by template.
Insert multimedia
This dialog is used to define the main settings of the multimedia object. It's a dynamic dialog, that changes with the type of multimedia the top file path or URL edit field refers. This field can point to local or Internet remote content, of type Flash SWF animations, MP3 audio, Flash FLV's and H.264 video, YouTube and Vimeo URL's.
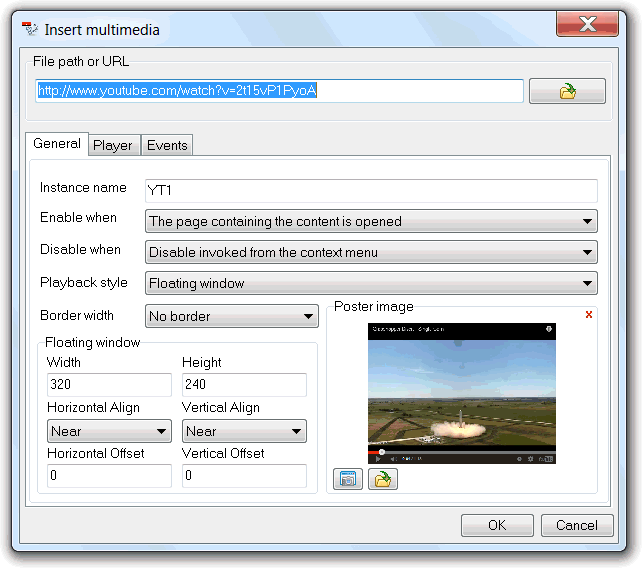
The main general tab is always present and unchanged, despite the multimedia type. It is used to define how the multimedia content will be played and interfaced from the PDF page and reader.
The instance name field is used to identify the object instance and is only needed for PDF JavaScript scripting.
How the multimedia starts and stops playing is defined with the enable when and disable when selectors. The utilization is simple, but the selected choices may impact the PDF reader resources usage. As example, for an animated logo that is going to be placed in all the pages, the enable option should be set when the page containing the content is visible, and the disable option for when the page is not visible, so to keep the reader related resource usage optimized.
The playback style defines if the multimedia plays embedded in the page (in the insert bounding box), if in a floating window or if hidden. The hidden option is useful to add background music to the PDF. When set to floating window, the position and size of the windows can be defined from the floating window options group.
The floating window options group width and height fields define the width and height of the floating player window. The horizontal align and vertical align field set the main position of this window, related to the top left or top right corners of the PDF reader application. The referred corner is defined by the current document left-to-right or right-to-left text reading order. The horizontal offset and vertical offset fields can be used to shift the main selected align position.
The poster image option is used to specify an image to shown in the page, in place of the multimedia for when the multimedia is not active/playing. It is also this image that will be used if the containing page is printed. Usually it is a snapshot of the multimedia itself, so there is a tool to play and grab snapshots, accessible from the take snapshot button, but any other representation may be used so there is also a button to select an external image file. This poster image can be further enhanced with a border, from the border width selector. This poster image should not be specified when the playback style is set to hidden, as in this situation there isn't, usually, any need to have a visual reference to the multimedia in the page area.
All the other settings tabs are dynamic and related to the content being inserted. For audio and video there is a tab named player, where it is possible to define some player settings, and setup playlists. For Flash SWF's there is a SWF tab, from where to specify the usual flashvars parameter, and a resources tab to enter external or remote files resources the SWF needs.
The events tab is used to specify JavaScript functions that will run in response to various of the scriptable events each file type player exposes. Events such as onPlay, onStop, or specific to the SWF being played, can be used to automate actions in the PDF presentation. It is in this case that it is mandatory to specify the instance name referred above, or the player will not be able to identify what script to call for each of the triggered events.
Actions editor
This editor is used to add, and edit, event actions assigned to a stamp object, such as launch a web link, or run a JavaScript.
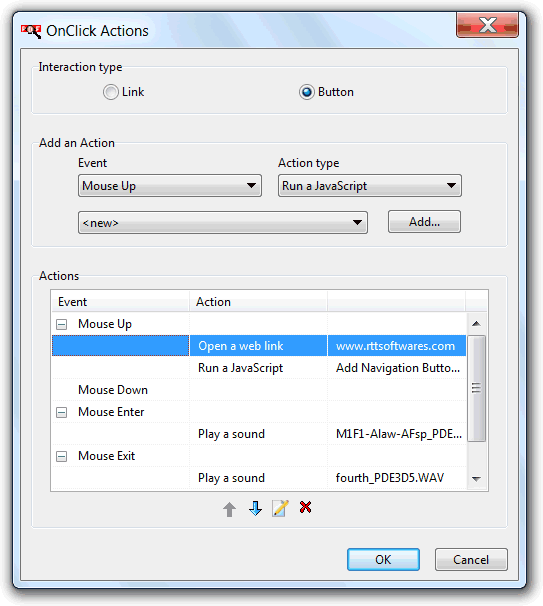
There are two possible interaction types, Link and Button. This defines what type of method will be used to capture the events. The link type can only respond to click events, and is the more suitable to launch web links, while the button type can respond to a more diverse type of events.
Each stamp object can have more than one action assigned, for the same or different event types.
To add an action there is only the need to select the type of action, the type of fire event when the interaction type is button, and click the add button. The combo box at the left of the add button shows a repository of saved, or last used, settings for the type of action selected, that can be used to easily enter a previously used/saved action.
After setting the action parameters, in its specific action editor, a new action will show in the list of actions. This list can then be used to edit the action again, and, more important, to define its order of execution when more than one action is assigned to the same event type.
The "run a JavaScript" action type is especially powerful, but its usage requires knowledge of the specificities of the PDFs JavaScript. At this page, there is plenty of information about the Acrobat JavaScript API (that may not be fully supported by other PDF readers), and many other very useful related resources.
Stamp options
The Files tab sheet is used to check the files that are going to be submitted to the stamp operation, define the documents pages to stamp, and to specify the stamp mode and stamped file save mode options.
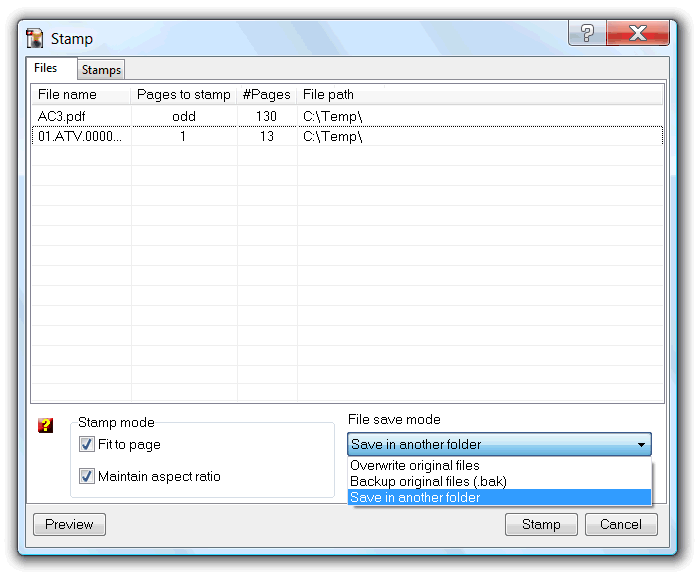
By default, all the documents pages are selected to be stamped, but the Pages to stamp column fields can be edited to custom define what pages to stamp, using the following rules:

The preview button uses the list selected file as file to stamp preview, so, to check how the current stamp template will look like when stamped onto a specific file, just make sure that file is selected before clicking the preview button.
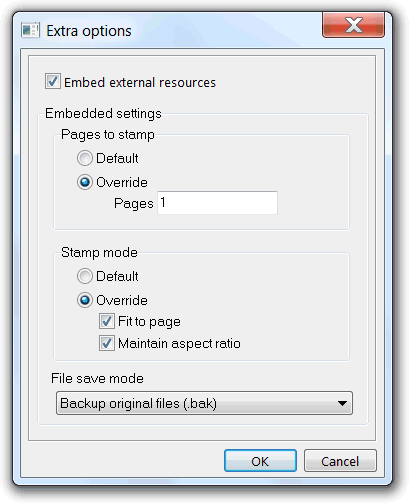
The stamp template is defined for an A4 page size, the one represented in the WYSIWYG output. The stamp mode options define how to behave when stamping pages with different sizes. The fit to page option will scale the stamp, up or down, in order to maintain proportionality to the designed stamp template. If the Maintain aspect ratio option is also checked, only the X scale proportionality is maintained, sacrificing the Y scale but maintaining the aspect ratio of the designed stamp template. Design scale will be used if Fit to page option is unchecked.
The file save mode selector define if the stamped file overrides the source file, if a backup unstamped file is created, or if user must be asked for an output folder where to put the stamped files.
This setting always assume the last used, or default, values, but can be differently imposed by stamp template, defining them on the save template extra options dialog. This extra options dialog is accessible from the Options button found at the save dialog.
Command line interface
| Function name: | Stamp |
| Options: | [] means optional parameter |
| [StampRules=] | - Expression that specify the document pages to stamp. See above image for syntax. |
| [Template=] | - Full path to a template file. A template file is a previous created, and saved, stamp job. |
| [OutputPath=] | - Full path where to create the stamped/watermarked files. If not specified, file source path is used instead |
| [-CreateBackup] | - If specified, create a backup file |
| [DynCustomText=] | - To feed a stamp template that has dynamic text objects that reference text items ([C#] constants) passed in this command line parameter. The value of this parameter should be a comma separated list of text items. A "DynCustomText='Item 1','Item 2','Item 3'", would replace, respectively, the [C1], [C2] and [C3] dynamic text constants. |
| [BatesStartNum=] | - To define the Bates numbering starting number. If specified, it will override the starting number defined in the template. |
| [-s] | - Silent mode. Run without showing the interface (only available for licensed users) |
| FilesList | - List of PDF files to Stamp; Separate files using the semicolon";" char. Must be the last parameter |
| Example: "c:\Program Files\PDF-ShellTools\PDFShellTools.exe" Stamp OutputPath=c:\Stamped stamprules=1 Template=c:\stamptemplates\MyLogo.stp C:\tmp\*.pdf |
|